📅 10 Feb 2021
Turning a regular soap dispenser into an automatic one using an Arduino
Today I’d like to write a bit about another Arduino project that was a direct result of the first Corona lockdown. The whole thing was cobbled together in a matter of a few hours using only spare parts that I had lying around at the time. Of course it took a few small iterations to smooth out the initial issues. 😉
Rewind to April 2020, the first lockdown had just started a few weeks before. We were locked at home, having to homeschool — or at least entertain — three children while also trying to work full-time from home. After a few weeks we were running out of ideas to keep them entertained. They had already finished a few basic Scratch projects and some basic woodworking. (Yes, woodworking 😁: a player-vs-player tabletop pinball machine. Maybe I’ll write something on that later.) I thought that it might be good to make something quite basic that would involve programming, woodworking and electronics. And what better appliance to make during a pandemic than an automatic soap dispenser.
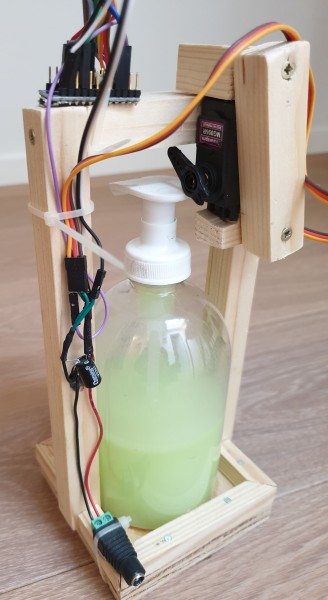
The final result
Let’s start by showing the final result. The initial version had several key differences, or rather issues that we’ll come back to later. Here’s some pictures of the front and back side.
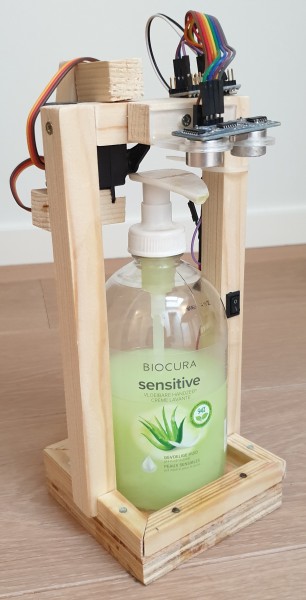
The wooden frame consists of a few parts, all of which were made to match the dimensions of the soap dispenser that we usually buy at our usual supermarket:
- a bottom frame consisting of a square piece of wood with wooden edges all around to keep the bottle from moving around;
- a vertical frame screwed to the bottom part which goes all around (over) the soap dispenser bottle;
- a frame to hold the servo that will push the soap dispenser.
The servo frame is quite tricky as the servo can apply quite a (reaction) force to the rest of the frame. As you can probably see, the final solution is quite pragmatic and ugly. But at least this iteration doesn’t just snap off after a couple of pushes. 😀
Then there’s the electronics. I’ll just sum up the parts that I’ve used. The wiring is very straightforward (see comments in Arduino code below), so I won’t show a schematic here. Basically everything is connected to the Arduino, except the power and ground line to the servo.
This is the Bill of Materials:
- Sparkfun Pro Micro 5V (clone), but any small form-factor Arduino will do
- Ultrasonic distance sensor (e.g. HC-SR04)
- Holder for ultrasonic sensor
- Time-of-flight LIDAR distance sensor (e.g. VL53L0X)
- Heavy-duty metal-gear servo (e.g. MG996R)
- 9V power supply (e.g. from a broken router)
- 1000µF capacitor
- (optional) Single-pole on/off switch
- (optional) Female DC power jack connector (matching the jack on the power supply)
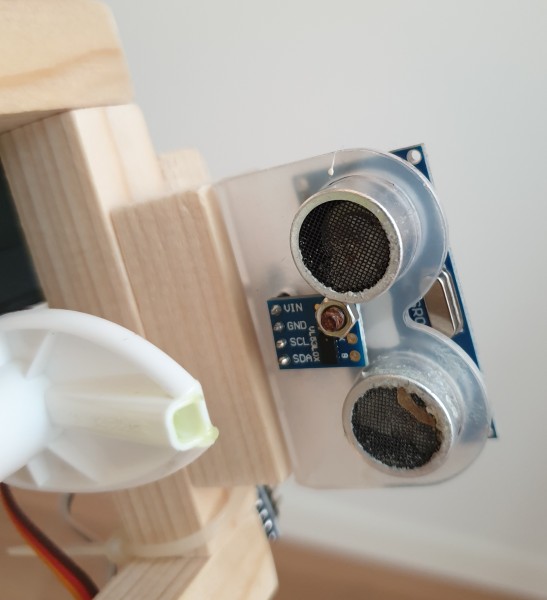
The basic idea is that the distance sensors will check for an object (=hand) within a certain range, and, if so, the servo will push the lever of the soap dispenser. When the hand moves away, the servo releases the lever.
Here’s a close-up of how the two distance sensors are mounted. Make sure to align the sensors such that the beams do not hit the soap dispenser lever.
Fail log
As mentioned before, the initial version was quite different to the result shown above. Here’s a list of a few things that went wrong and then got fixed.
-
I already mentioned that the wooden servo holder construction snapped off a few times. The servo that I’m using can exert about 10kg×cm. So, make sure to use a sturdy construction.
-
You might wonder why there are two distance sensors in this setup. Well, the reason is fairly simple: with only one sensor you will sporadically get false triggers, even with software signal filtering. Especially the ultrasonic sensor is prone to this. This means that, in the morning, you’ll find the bottle empty and the floor covered in muck. (insert your own sexual inuendo here) 😜 I had to convince my better half to allow an updated prototype in to the bathroom. In any case, I haven’t had a single false trigger since (9 months and counting).
-
Use a servo with metal gears that can do at least 10kg×cm. You might be surprised at the amount of force that is required to press and hold the lever. In fact, even the metal gear servo failed after about half a year of intensive use. Luckily, they’re only a few euros/dollars.
Final notes
That’s it. That’s all there is to this small hobby project.
In the end, the kids lost interest after they helped make the wooden frame, so I ended up doing most of the electronics myself. But I think they at least learned a few things along the way. And they definitely use this dispenser very extensively; and show it off to other people, boasting about how they made this themselves. 😉
Finally, here’s the Arduino code. The only dependencies are the Servo library, the NewPing library and the Adafruit VL53L0X library, which can be installed through the Arduino library manager.
#include <Servo.h>
#include <NewPing.h>
#include <Adafruit_VL53L0X.h>

#define TRIGGER_PIN  15
#define ECHO_PIN     14
#define MAX_DISTANCE 12

// distance sensor laser
Adafruit_VL53L0X lox = Adafruit_VL53L0X();
#define SUPPLY_PIN 4  // feed laser sensor through digital pin due to lack of vcc pins
VL53L0X_RangingMeasurementData_t measure_laser;

#define OUT_OF_RANGE 2000

// distance sensor sonar
NewPing sonar(TRIGGER_PIN, ECHO_PIN, MAX_DISTANCE);

Servo servo;
int rest_angle = 0;
int pump_angle = 50;
int mini=500;
int maxi=2500;
int trigger_distance = 110;  // in mm
bool pumping = false;

void setup() {
  pinMode(SUPPLY_PIN, OUTPUT);
  digitalWrite(SUPPLY_PIN, HIGH);
  servo.attach(9,mini,maxi);
  servo.write(rest_angle);
  delay(500);
  servo.detach();
  Serial.begin(115200);
  delay(500);

  Serial.println("Adafruit VL53L0X test");
  if (!lox.begin()) {
    Serial.println(F("Failed to boot VL53L0X"));
    while(1);
  }
  // power
  Serial.println(F("VL53L0X API Simple Ranging example\n\n"));
}

void loop () {
  int laser_distance = laser_measure();

  if (laser_distance < trigger_distance) {
    int sonar_distance = sonar_measure();
    laser_distance = laser_measure();
    if ((sonar_distance < trigger_distance) && (laser_distance < trigger_distance)) {
      if (!pumping) {
        Serial.println("hand detected");
        servo.attach(9,mini,maxi);
        delay(15);
        for (int i=rest_angle; i<pump_angle; i++) {
          servo.write(i);
          delay(20);
        }
      }
      pumping = true;
    }
  } else {
    if (pumping) {
      Serial.println("hand removed");
      servo.write(rest_angle);
      delay(1000);
      servo.detach();
    }
    pumping = false;
  }
  delay(100);
}

int laser_measure() {
  int distance = OUT_OF_RANGE;

  lox.rangingTest(&measure_laser, false); // pass in 'true' to get debug data printout!
  if (measure_laser.RangeStatus != 4) {  // phase failures have incorrect data
    distance = measure_laser.RangeMilliMeter;
    Serial.print("Laser distance (mm): ");
    Serial.println(distance);
  } else {
    Serial.println(" out of range ");
  }
  return distance;
}

int sonar_measure() {
  Serial.print("Sonar distance (mm): ");
  int distance = sonar.ping_cm()*10;
  Serial.println(distance);
  if (distance == 0) distance = OUT_OF_RANGE;
  return distance;
}
💬 Looking for comments?
I don't have comments on this site as they're difficult to manage and take up too much time. I'd rather concentrate on producing content than managing comments.
Instead of leaving a comment, feel free to contact me ✉️ contact me instead.