📅 22 Jan 2021
Creating a website based on Hugo and simple.css
As my second post for #100DaysToOffload I wanted to talk about how I made this website.
Preamble
(Feel free to skip to the next section if you don’t care about my motivation. 😉)
In the past (10+ years ago) I had already made a personal family website. This site was completely handrolled using html, css and php and mysql. The main purpose was to share photos of our then-newly-born children with other extended family members and friends. This was around the same time that facebook started gaining mainstream traction. However, my wife and I instinctively felt that it wouldn’t be a good idea to share those private photos on such a platform. So, with some pointers from a colleague, I completely handrolled a site, including a guestbook with anti-spam measures. That site has long gone. But what stuck was that I didn’t want to repeat that exercise in the future. ☺️
Fast forward to now. I wanted to create another website to self-document some projects. In my search for a better way to create a simple static website, I stumbled upon a few posts made by kev on fosstodon: firstly, the release of simple.css, followed by a very detailed blog post on how to use jekyll to produce a site based on simple.css. I followed the instructions in that brilliant post and had a site up-and-running within about an hour. However, the only thing I disliked about this approach was the large list of dependencies that are required to get jekyll up and running.
Cue Hugo. I had already dabbled with this tool before reading the jekyll post. The main advantage of Hugo is that it has no dependencies. It’s just one binary that does it all. That sounded very promising. However, my first experiments were quite disappointing because the walk-through on the website only mentions the use of pre-defined themes, none of which I liked. Most of the themes looked simple, but were quite bloated underneath, e.g. pulled in lots of javascript. This is — on its own — not very dramatic, because themes can be adapted. However, I soon found out that the documentation — while seemingly very complete in details — had no intermediate level which explained all the moving parts to newcomers.
When I revisited Hugo after reading kev’s post, it all started making sense. Hugo is quite similar to Jekyll, so that extra knowledge was enough for me to start making sense of the Hugo documentation. It turns out that it’s possible to make a Hugo site based on simple.css which both in appearance and source code looks very similar to the Jekyll example. So that’s what I want to run through in this post.
Prerequisites
I’m assuming here that you’ve read through kev’s post on how to create a Jekyll site with simple.css. That allows to skip most of the excruciating details. I will also skip the hosting part. I will probably spend another post on this. I’m currently hosting the site on my own homeserver, and I’m also using git to automatically push updates.
The list of dependencies you need to install to get started is pretty simple:
- Install Hugo on your machine;
- (Optional) Install git on your machine.
Most linux distributions will have the Hugo package in the standard repository so just fire up the package manager and you’re done. No additional steps required. Similar to python, Hugo comes with all required stuff included.
Step 1 - Setting up your git repo (optional)
I’ll just refer to kev’s post here.
The only thing to add, is that there doesn’t seem to be a standard .gitignore template for Hugo on github. So instead I used this one.
NOTE If you’re very lazy, you can pull the final result of this tutorial from the hugo-simple.css repository on Github.
Step 2 - Hugo folder structure
In order to create the skeleton folder structure for our site, we simply run the following command in the directory that we want to create the site directory in:
$ hugo site new simplecss-site
where simplecss-site is the name of the site that we want to create. This command will create the directory simplecss-site inside the current directory.
The output should look something like this:
Congratulations! Your new Hugo site is created in /home/mogwai/git/simplecss-site.

Just a few more steps and you're ready to go:

1. Download a theme into the same-named folder.
   Choose a theme from https://themes.gohugo.io/ or
   create your own with the "hugo new theme <THEMENAME>" command.
2. Perhaps you want to add some content. You can add single files
   with "hugo new <SECTIONNAME>/<FILENAME>.<FORMAT>".
3. Start the built-in live server via "hugo server".

Visit https://gohugo.io/ for quickstart guide and full documentation.
If you enter this directory, you should now see the following automatically-created directory structure.
📁 archetypes
    |_  📝 default.md
📁 content
📁 data
📁 layouts
📁 resources
📁 static
📁 themes
📝 config.toml
Now let’s add some extra directories that we will need. The resulting directory structure should then look like this:
📁 archetypes
    |_  📝 default.md
📁 content
    |_ 📁 blog
📁 data
📁 layouts
    |_ 📁 _default
    |_ 📁 partials
    |_ 📁 blog
📁 resources
📁 static
    |_ 📁 css
    |_ 📁 images
📁 themes
📝 config.toml
Note the leading underscores on some of the names; this is important!
Step 3 - Hugo config file
Similar to Jekyll, all Hugo site configuration is done through a central configuration file in the root directory of the repo. By default the hugo new site command creates a config.toml file. Next to toml it’s also possible to define the configuration in yaml of json: just change the extension of the config file. Since Hugo created a default toml file, let’s proceed with that one.
This is what the automatically created config.toml looks like:
baseURL = "http://example.org/"
languageCode = "en-us"
title = "My New Hugo Site"
We’ll update these fields with the information relevant to our site and add one more entry:
baseURL = "https://mydomain.org"
languageCode = "en-us"
title = "Simple Hugo"

[permalinks]
  blog = "/:title/"
Of course, you should fill out values which are relevant to your site.
The additional [permalinks] bit will ensure that links to the blog posts will show up as https://mydomain.org/post-title/ rather than https://mydomain.org/blog/post-title/ (so no blog).
We’ll leave this file for now. But we’ll be returning to it later on.
Step 4 - Layout: the generic html page template
NOTE: Before we start, I should point out that the conventional way of doing layout in Hugo is through themes. Traditionally, we would now download a theme and put it into the
themesdirectory, or we would populate the theme withgit submoduleinto that directory. We’re not going to do that for this tutorial, though. If I find the time, I might turn the result of this tutorial into a full-blown theme such that you would only have to download these files and directly proceed with adding your content to the site. If and when that happens, I’ll put a link here. For now … let’s move on.
Just like Jekyll, Hugo uses layout templates as a framework to surround the content that you write. We’re going to start by creating and filling the most basic template: the baseof.html file. As the name suggests, this template is going to be the basis of all the different layouts of our site.
We’ll create a new file at layouts/_default/baseof.html, and then add the following to this file:
<!DOCTYPE html>
<html>
  {{ partial "head.html" . -}}
  <body>
    {{ partial "header.html" . -}}
    <main>
      {{- block "main" . }}{{- end -}}
    </main>
    {{ partial "footer.html" . -}}
  </body>
</html>
We are making use of a few pieces of Hugo syntax that we should probably explain first:
- Double curly brackets
{{ expr }}: anything inside these brackets will get interpreted by Hugo when building the site. An extra dash (-) next to such brackets indicates that whitespace should be removed on that side of the result of the Hugo expression. - Keyword
partial: this can be used to insert the content of another file. Hugo will look for the filename inside the directorylayouts/partials. - Keyword
block: similar topartialbut now the content of a “block” of code is inserted rather than an external file; a block is something we can define in Hugo code. We use this for the<main>section so that we can discriminate between the layouts needed for the main page, blog overview and blog posts.
Of course, our next step is to define these partials and blocks.
Step 4a - head
NOTE: If you want, you can now create a favicon and save it to
static/images. If you don’t have or want to use a favicon, simply remove the line related to favicon mentioned below.
Create a new file and save it to layouts/partials/head.html. Then, add the following lines of HTML:
<head>
    <meta charset="utf-8">
    <meta name="viewport" content="width=device-width, initial-scale=1.0">
    <link rel="icon" href="/images/favicon.png" />
    <title>{{ .Title }} | {{ .Site.Title }}</title>
    <meta name="description" content="{{ .Description }}" />
    <link rel="stylesheet" href="https://cdn.simplecss.org/simple.min.css">
    <link rel="stylesheet" href="/css/custom.css"/>
</head>
We’re using a few new concepts here.
First note the use of {{ .Site.Title }}. The double curly brackets invoke the Hugo interpreter and tell it to look for the content of the variable Title within the scope Site. This will refer to the title field that we had added to the config.toml file. (In programming terms, .Site will refer to a variable at “global” scope.)
Next to that, it’s also possible to explicitly refer to a .Page scope variable. E.g. {{ .Page.Title }} will refer to the title of the page rather than the whole site. If the page has no title, nothing will be inserted. We will show later how to assign values to such page variables.
Finally, it’s also possible to not explicitly define a scope: e.g. {{ .Title }}. In that case, Hugo will first look for the title in the local scope (i.e. the page) and, if it’s not defined, will fall back to the site-wide title variable.
NOTE: In Hugo template syntax, variables defined in configuration files or frontmatter of pages should be all lowercase, but they are referred to in the templates with a capitalized first character! I know that is very confusing…
Feel free to remove the favicon and/or custom.css lines if you’re not interested in adding a favicon or tweaking the style sheet yourself.
Step 4b - header
Create a new file and save it to layouts/partials/header.html. Then add the following:
<header>
  <h1>{{ .Title }}</h1>
  <p>{{ .Description }}</p>
  {{ partial "navigation.html" . -}}
</header>
No new syntax elements here: this code will add a header showing the page title and description, and a navigation bar below (which we still have to define).
Step 4c - footer
Again, create a new file called layouts/partials/footer.html and fill it with:
<footer>
  <p>This site was made by Myself and was made using <a href="https://gohugo.io">Hugo</a> and
  <a href="https://simplecss.org">Simple.css</a>.</p>
</footer>
Again, pretty straightforward; simply adjust the text to apply to your site.
Step 4d - navigation
Last step is to define the navigation.html partial that we’ve referred to in the header section.
Similar to the Jekyll case, we’ll split the navigation into two parts: the definition of menu entries (names and associated URLs) and the code that will add those entries to the html itself.
Let’s start with the entries. Hugo natively supports menus in the sense that it has predefined internal variables. It’s good practise to use these because it allows to change themes easily if you should want to later on.
There are several ways to define the menu entries, but the simplest is to do it through the main config.toml file. So we’ll re-open this file and add some extra bits to it. The result should look like this:
baseURL = "https://mydomain.org"
languageCode = "en-us"
title = "Simple Hugo"

[permalinks]
  blog = "/:title/"

[menu]
  [[menu.main]]
    identifier = "home"
    name = "Home"
    url = "/"
    weight = 10

  [[menu.main]]
    identifier = "blog"
    name = "Blog"
    url = "/blog"
    weight = 20

  [[menu.main]]
    identifier = "about"
    name = "About"
    url = "/about"
    weight = 30

  [[menu.main]]
    identifier = "contact"
    name = "Contact"
    url = "/contact"
    weight = 40
The weight will determine the order of the menu entries. It’s also good to note here that each entry needs a unique identifier field, in case you’re wondering why we add superfluous informaton.
Now we move on to the bit that will generate the HTML code for the menu.
Create a new file layouts/partials/navigation.html and add the following contents:
<nav>
  {{ range .Site.Menus.main.ByWeight -}}
    {{ .Pre }}<a href="{{ .URL }}" title="{{ .Title }}">{{- .Name -}}</a>{{ .Post }}
  {{- end }}
</nav>
This code will loop over the items that we defined in the main config file ordered by the weight value and add the relevant links.
NOTE Just ignore the
{{ .Pre }}and{{ .Post }}bits for now; we’re not going to use them for this site. It suffices to known that they are standard Hugo menu syntax that allows to add extra content before or after the navigation links in case you would ever require that functionality.
Step 5 - Layouts
So far we’ve only worked on the generic html template. Note that we’ve also silently skipped over the definition of the "main" block. All that is about to change. 😉
Any site will require different types of layout of the content. For our site we will define specific layouts for the top-level pages (i.e. homepage, about, contact), the blog post overview page and a specific layout for the posts themselves.
Before we dive into that, it’s good to mention that Hugo discriminates between two types of page templates: single.html and list.html. The former applies to pages which just have to display a “single item of content”, e.g. the homepage or a single blog post. The latter applies to pages that have to display a list of contents, e.g. the blog overview page. Next to that, Hugo also demands that we define an explicit layout template for the homepage index.html.
Step 5a - default single layout
Create a file layouts/_default/single.html with the following contents:
{{ define "main" }}
  {{ .Content }}
{{ end }}
This template defines the "main" block that we referred to in the generic template baseof.html. All it does is add the static page content.
This is the default template, so it will be used for the about and contact pages, but also for the individual blog post pages. However, we would like to add some more information to the blog post pages. We can do that by overriding the default template for the blog posts.
Step 5b - blog post single layout
In order to do this, we create the file layouts/blog/single.html. This template will override the default one for posts which we will be adding to the content/blog directory later on.
So, create a new file layouts/blog/single.html and add the following:
{{ define "main" }}
<p>📅 {{ .Date.Format "2 Jan 2006" }}</p>

{{ .Content }}

<br>
<hr>

<h2>💬 Looking for comments?</h2>

<p>I don't have comments on this site as they're difficult to manage
and take up too much time. I'd rather concentrate on producing content
than managing comments.</p>

<p>Instead of leaving a comment, feel free to contact me
✉️ <a href="/contact">contact me</a> instead.</p>
{{ end }}
Again, this file defines the "main" block: it will display the {{ .Content }} of the post, but will also add extra goodness before and after. Feel free to tweak the date format; just specify an example date in the format that you would like to appear.
NOTE More generally, for each piece of content that is added to a subdirectory of the
contentdirectory (e.g.content/blog), Hugo will look for a matchingsingle.htmlorlist.htmlfile in a similarly named subdirectory inlayouts(e.g.layouts/blog).
Step 5c - blog post list layout
Similarly, we want to add a specific layout for the blog post listing page. We do that by creating the file layouts/blog/list.html and add the following to the file:
{{ define "main" }}
  {{ .Content }}
  {{- range where site.RegularPages "Type" "in" site.Params.mainSections }}
    <p><a href="{{ .Permalink }}">{{ .Title }}</a><br>
    {{ .Description }}<br>
  📅 {{ .Date.Format "2 Jan 2006" }}</p>
  {{- end }}
{{ end }}
The code here loops over all the posts and adds links with the title, description and date of each post. Again, the date format can be tweaked to your liking.
Step 5d - homepage layout
Finally, we have to add a dedicated template for the homepage. This is a hard requirement set by Hugo, so we need to define it even if we don’t need it. In our case, we just want to show the content.
So, create a new file layouts/index.html with the following contents:
{{ define "main" }}
  {{ .Content }}
{{ end }}
That’s it, we’re all done creating the layouts. Now we can start adding the real content.
Step 5 - Adding content
Creating a content file (a page or blog post) is very simple. You just use the command hugo new name-of-top-level-page.md or hugo new blog/title-of-blog-post.md and Hugo will create a skeleton file in the relevant location within the contents directory. Note that this command should be run from the toplevel Hugo directory.
Those files will contain a frontmatter and a content section below that, which is to be written in markdown syntax. I’ll refer to Kev’s post here for more details on frontmatter.
Step 5a - Default markdown template
Before we do that, however, we should tweak the template for new markdown posts first. We do that by opening the automatically generated file archetypes/default.md. This file should already contain the following:
---
title: "{{ replace .Name "-" " " | title }}"
date: {{ .Date }}
draft: true
---
As you can see, this template defines some defaults for the frontmatter . We are just going to add an extra entry for description because we have used that variable extensively in our layouts. It’s good to have this pre-populated in new markdown files so we don’t forget to add a description. The resulting file should look like this:
---
title: "{{ replace .Name "-" " " | title }}"
description: ""
date: {{ .Date }}
draft: true
---
The only special Hugo thing to note here is the draft field. If draft: true is set in the frontmatter, then that page will not show up on the final generated website. It will only show up if you explicitly enable the viewing of draft pages (see next section).
Once you’re satisfied with your post, you remove the draft field entry or set it to false.
Step 5b - Homepage
Run the command hugo new _index.md, which will create a skeleton markdown file for our homepage in content/_index.md. Now edit the frontmatter and add the markdown content such that you get this result:
---
title: "Simple Hugo {}"
description: "A Hugo site powered by Simple.css"
---

# Welcome to Simple Hugo

This is a simple webpage that has been handbuilt by Myself using the
Hugo static site generator and [Simple.css](https://simplecss.org).

Please feel free to take a look around. If you're interested, you can
find the source code for this site [on GitHub](https://github.com/mogwa1/hugo-simple.css).
Note that draft: true has been removed from the frontmatter!
NOTE I’ve removed the
datefield here because it’s not used in the template for the top-level pages. You can leave it in if you want; it won’t matter. It will be important for the blog posts though.
Step 5c - Blog post listing page
We’ve already made a full-blown layout for this. The only thing which is still needed is a title and a description. So we only have to generate and update the frontmatter.
Run hugo new blog/_index.md and edit the resulting file located at content/blog/_index.md to add an appropriate title and description:
---
title: "Blog"
description: "Where the magic happens - this is the blog!"
---
If you want, you can still add markdown text, which will show up before the blog post listing.
Step 5d - About page
Run the command hugo new about.md and edit the resulting file content/about.md.
---
title: "About"
description: "This page tells you a little bit about this website."
---

Lorem ipsum dolor sit amet consectetur adipiscing elit ullamcorper
integer scelerisque luctus, lobortis praesent erat est penatibus
fringilla potenti libero facilisis aptent. Vestibulum mi posuere
faucibus aliquet lacinia pharetra donec gravida eu interdum, cum
ultricies placerat lectus montes cursus torquent tempor non, bibendum
congue nascetur primis proin fames conubia maecenas praesent. Rhoncus
purus proin et suscipit egestas class mauris curabitur condimentum,
quis dis porta velit commodo nostra morbi turpis.

Taciti placerat nascetur duis auctor facilisis conubia pulvinar,
lobortis tincidunt justo dui lectus et gravida condimentum, egestas
magna himenaeos penatibus interdum velit. Primis curae eu orci
elementum viverra rhoncus fames maecenas enim euismod ad bibendum
odio aptent vitae augue varius fusce, proin curabitur cum et quis
sollicitudin congue dictumst litora lacus urna accumsan ligula
ullamcorper a est convallis. Aptent mollis est habitasse morbi eros
metus egestas, tellus ornare iaculis hendrerit ultrices sodales quis
sagittis, semper habitant euismod facilisi ultricies magna.
Step 5e - Contact page
We’ll leave this up to you as an exercise.
Step 5f - Adding blog posts
I assume that you got the gist of this now. 😉
Run hugo new blog/hello-world.md and add some fake content:
---
title: "Hello World"
date: 2021-01-21T16:41:55+01:00
description: "The first post on this little blog."
draft: true
---

Lorem ipsum dolor sit amet consectetur adipiscing elit ullamcorper
integer scelerisque luctus, lobortis praesent erat est penatibus
fringilla potenti libero facilisis aptent. Vestibulum mi posuere
faucibus aliquet lacinia pharetra donec gravida eu interdum, cum
ultricies placerat lectus montes cursus torquent tempor non, bibendum
congue nascetur primis proin fames conubia maecenas praesent. Rhoncus
purus proin et suscipit egestas class mauris curabitur condimentum,
quis dis porta velit commodo nostra morbi turpis.

Taciti placerat nascetur duis auctor facilisis conubia pulvinar,
lobortis tincidunt justo dui lectus et gravida condimentum, egestas
magna himenaeos penatibus interdum velit. Primis curae eu orci
elementum viverra rhoncus fames maecenas enim euismod ad bibendum
odio aptent vitae augue varius fusce, proin curabitur cum et quis
sollicitudin congue dictumst litora lacus urna accumsan ligula
ullamcorper a est convallis. Aptent mollis est habitasse morbi eros
metus egestas, tellus ornare iaculis hendrerit ultrices sodales quis
sagittis, semper habitant euismod facilisi ultricies magna.
Seeing your work
Now that we’ve finished setting up the configuration, templates, layouts and content, we would like to have a look at the actual site. Similar to Jekyll, Hugo has a built-in webserver that can be used to produce a development version of the site on your local computer so you can have a preview.
Go to the toplevel directory and run the command:
$ hugo server -D
You should see something like this pop-up:
Start building sites …
WARN 2021/01/22 14:44:47 found no layout file for "HTML" for kind "taxonomy": You should create a template file which matches Hugo Layouts Lookup Rules for this combination.
WARN 2021/01/22 14:44:47 found no layout file for "HTML" for kind "taxonomy": You should create a template file which matches Hugo Layouts Lookup Rules for this combination.

                   | EN
-------------------+-----
  Pages            |  9
  Paginator pages  |  0
  Non-page files   |  0
  Static files     |  1
  Processed images |  0
  Aliases          |  0
  Sitemaps         |  1
  Cleaned          |  0

Built in 12 ms
Watching for changes in /home/mogwai/git/simplecss-site/{archetypes,content,layouts,static}
Watching for config changes in /home/mogwai/git/simplecss-site/config.toml
Environment: "development"
Serving pages from memory
Running in Fast Render Mode. For full rebuilds on change: hugo server --disableFastRender
Web Server is available at http://localhost:1313/ (bind address 127.0.0.1)
Press Ctrl+C to stop
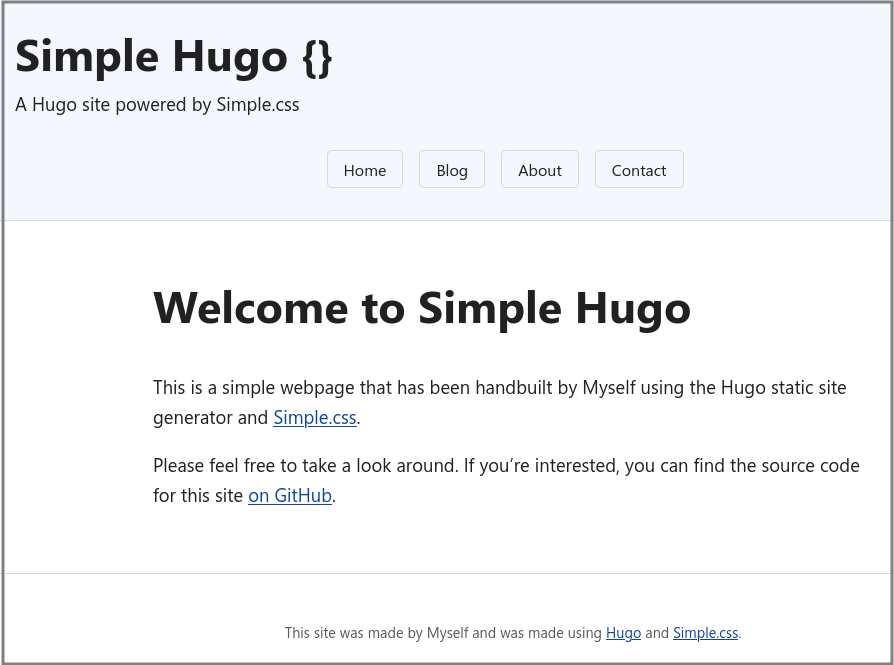
If you now visit http://localhost:1313/ in your browser, you should see the homepage of our newly built website, which should like something like this:
The option -D tells Hugo to serve a development version of the site, which will include draft pages. This is useful to see the live-updated result of a post while writing it. The built-in server will automatically update the webpages if you touch any of the input files.
Generating a production-worthy version of the site
Again, this is pretty simple. In the toplevel directory, just run:
$ hugo
This will create the static production site in the public subdirectory. Just copy the contents of this folder over to your webserver directory. That’s it, that’s all there is to it.
Final notes
There are still some loose ends that I might treat in follow-up posts:
Hosting
I’m self-hosting my site so I don’t have any experience with using hosting providers that might natively support Hugo. I’ll probably do another post to describe how I automatically push website updates through git to the webserver.
UPDATE: here’s the link to the post describing how to automatically update a live website using git.
RSS feed
Hugo has built-in support for RSS feeds. This will require another template and a few extra lines of code in the head section. Nothing fancy, but it would have taken us a bit too far in this tutorial.
UPDATE: here’s the link to the post describing how to add an RSS feed.
Syntax highlighting
Hugo has built-in support for syntax highlighting in code blocks. However, the out-of-the-box setup of Hugo and Simple.css will generate code blocks with black-on-black text. This can probably be solved quite easily but I haven’t found the time to look into this yet. As a temporary solution, I’ve switched to a light-background highlighting theme on this site. You can do that by adding the following to the config.toml file:
[markup]
  [markup.highlight]
    style = "monokailight"
The “taxonomy” warning
Running hugo server -D will show an error related to taxonomy. This can safely be ignored for this simple site because we’re not using this functionality.
Credits
This post heavily draws on kev’s post “How To Build A Jekyll Site Using Simple.css” shared under CC BY-SA 4.0.
As already mentioned about a hundred times, a huge shoutout to Kev for writing the detailed Jekyll explanation. Due to similarities between the two frameworks, that explanation was sufficient for me to start grasping the basics of Hugo up to the point that the documentation started making sense.
💬 Looking for comments?
I don't have comments on this site as they're difficult to manage and take up too much time. I'd rather concentrate on producing content than managing comments.
Instead of leaving a comment, feel free to contact me ✉️ contact me instead.